User login
Interactive Approach to Teaching Mohs Micrographic Surgery to Dermatology Residents
Interactive Approach to Teaching Mohs Micrographic Surgery to Dermatology Residents
Practice Gap
Tissue processing and complete margin assessment in Mohs micrographic surgery (MMS) are challenging concepts for residents, yet they are essential components of the dermatology residency curriculum. We propose a hands-on active teaching method using craft foam blocks to help residents master these techniques. Prior educational tools have included instructional videos1 as well as the peanut butter–cup and cantaloupe analogies.2,3 Specifically, our method utilizes inexpensive, readily available supplies that allow for repeated practice in a low-stakes environment without limitation of resources. This method provides an immersive, hands-on experience that allows residents to perform multiple practice excisions and simulate positive peripheral or deep margins, unlike tools that offer only fixed-depth or purely visual representations. Additionally, our learning model uniquely enables residents to flatten the simulated tissue, providing a clearer understanding of how a 3-dimensional specimen is transformed on a slide during histologic preparation. This step is particularly important, as tissue architecture can shift during processing, making it one of the most difficult concepts to grasp without hands-on experience. Having a multitude of teaching methods is crucial to accommodate various learning styles, and active learning has been shown to enhance retention for dermatology residents.4
The Technique
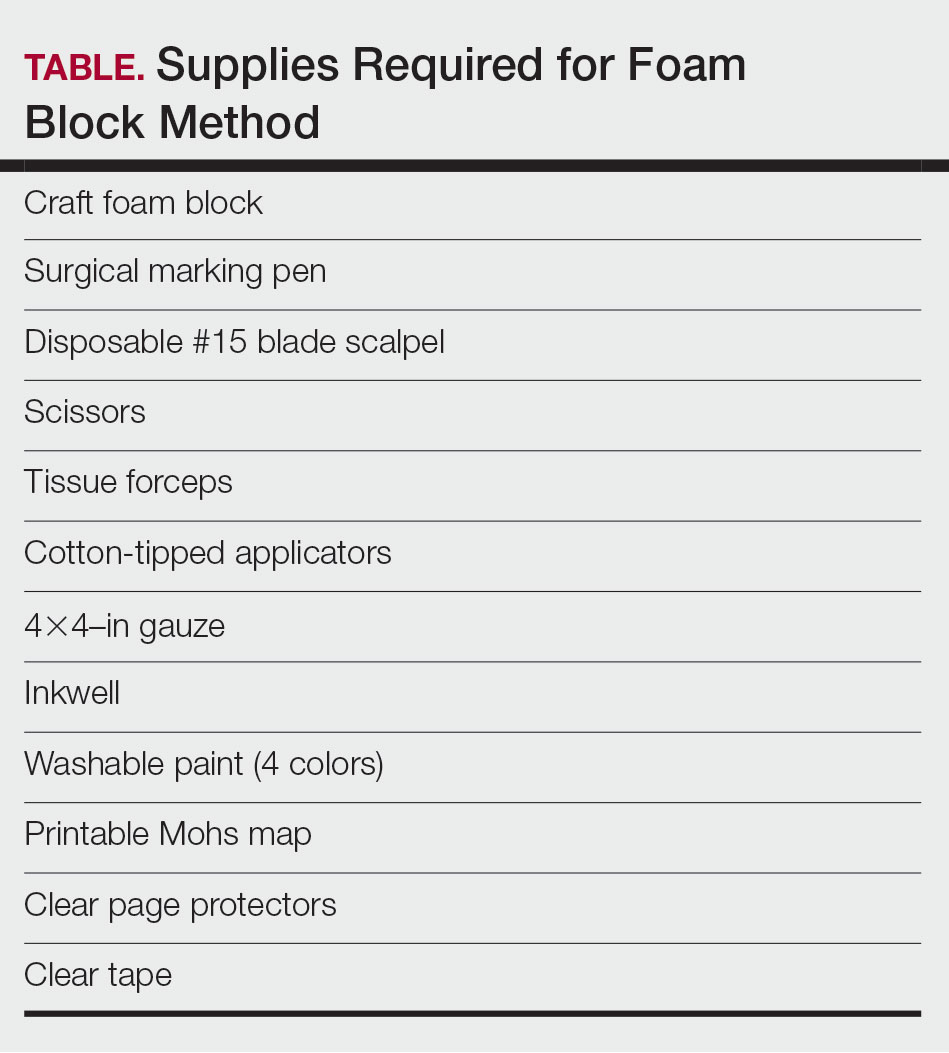
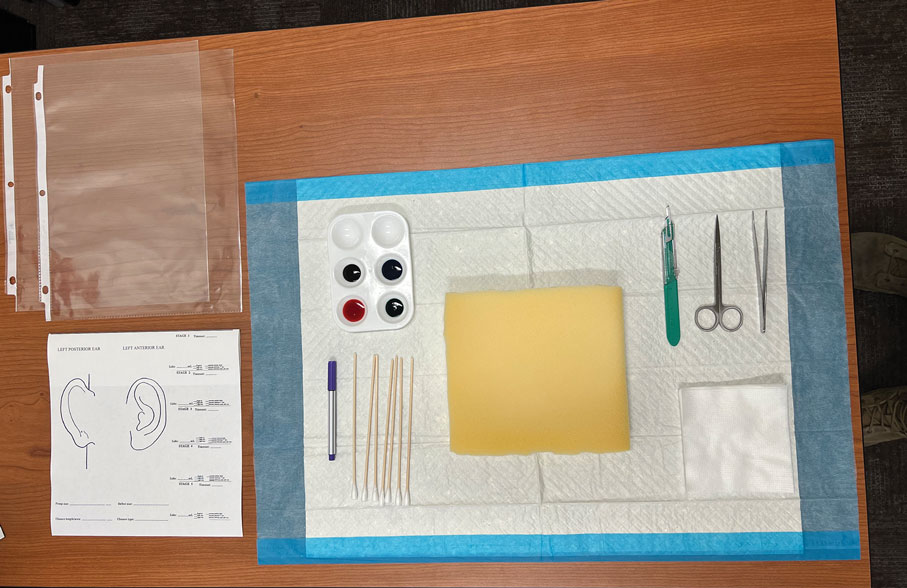
Residents use simple art supplies (including craft foam blocks and ink) and inexpensive, readily available surgical tools to simulate MMS (Table)(Figure 1). If desired, the resident can follow along with the comprehensive, stepwise textbook description of MMS, outlined by Benedetto et al5 to contextualize this hands-on exercise within a standardized didactic framework.
The foam block, which represents patient tissue, serves as the specimen. The resident begins by freehand drawing a simulated cutaneous tumor directly onto the foam using a surgical marking pen. At this point, the instructor discusses the advantages and limitations of tumor debulking with a sharp blade or curette. Residents then mark appropriate margins (1-3 mm) of normal-appearing “epidermis” on the foam block and add hash marks for orientation. This is another opportunity for the instructor to discuss common methods for marking tissue in vivo and to review situations when larger or smaller margins might be appropriate.
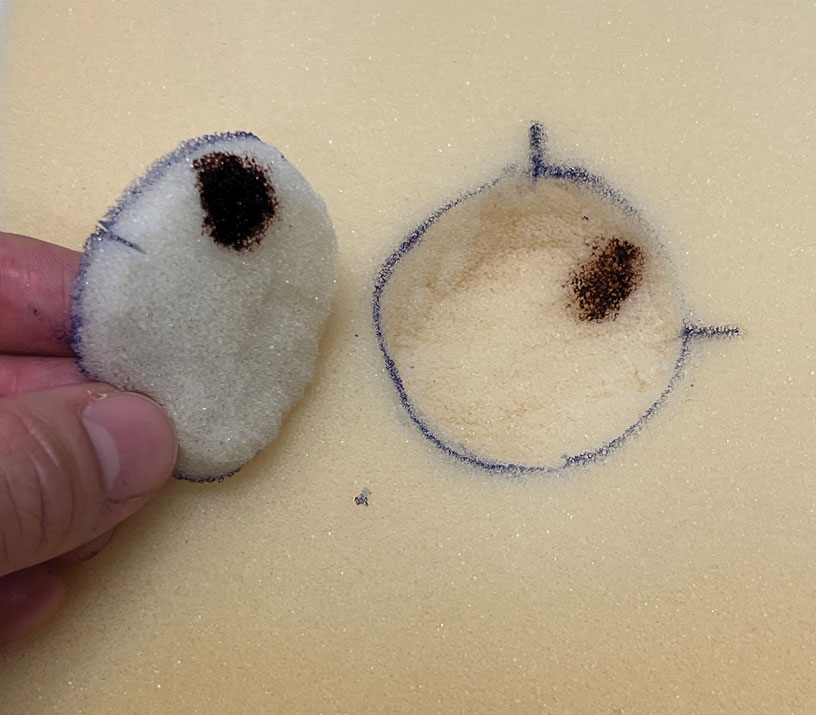
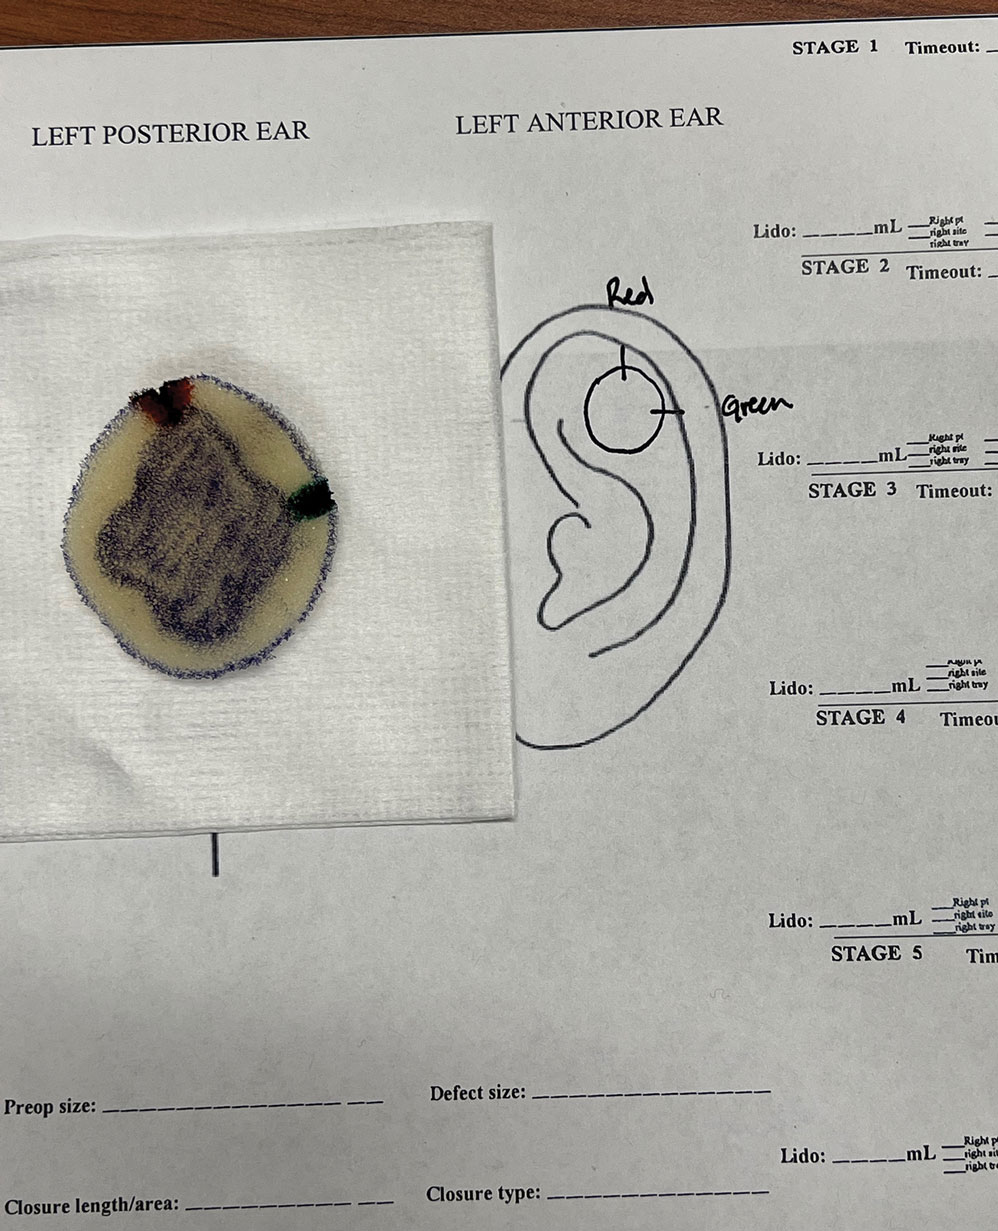
Next, the resident removes the first layer of simulated tissue using a disposable #15 blade scalpel at a 45° angle circumferentially and deep around the representative tumor. The resident also may use scissors and tissue forceps to remove the representative tumor. Next, the excised foam layer (the simulated “specimen”) is transferred to gauze. To demonstrate a positive margin, the resident or instructor marks the deep or peripheral foam block with a surgical marking pen, indicating residual tumor (Figure 2). This allows for multiple sequential layers of foam to be removed, demonstrating successive stages of MMS.
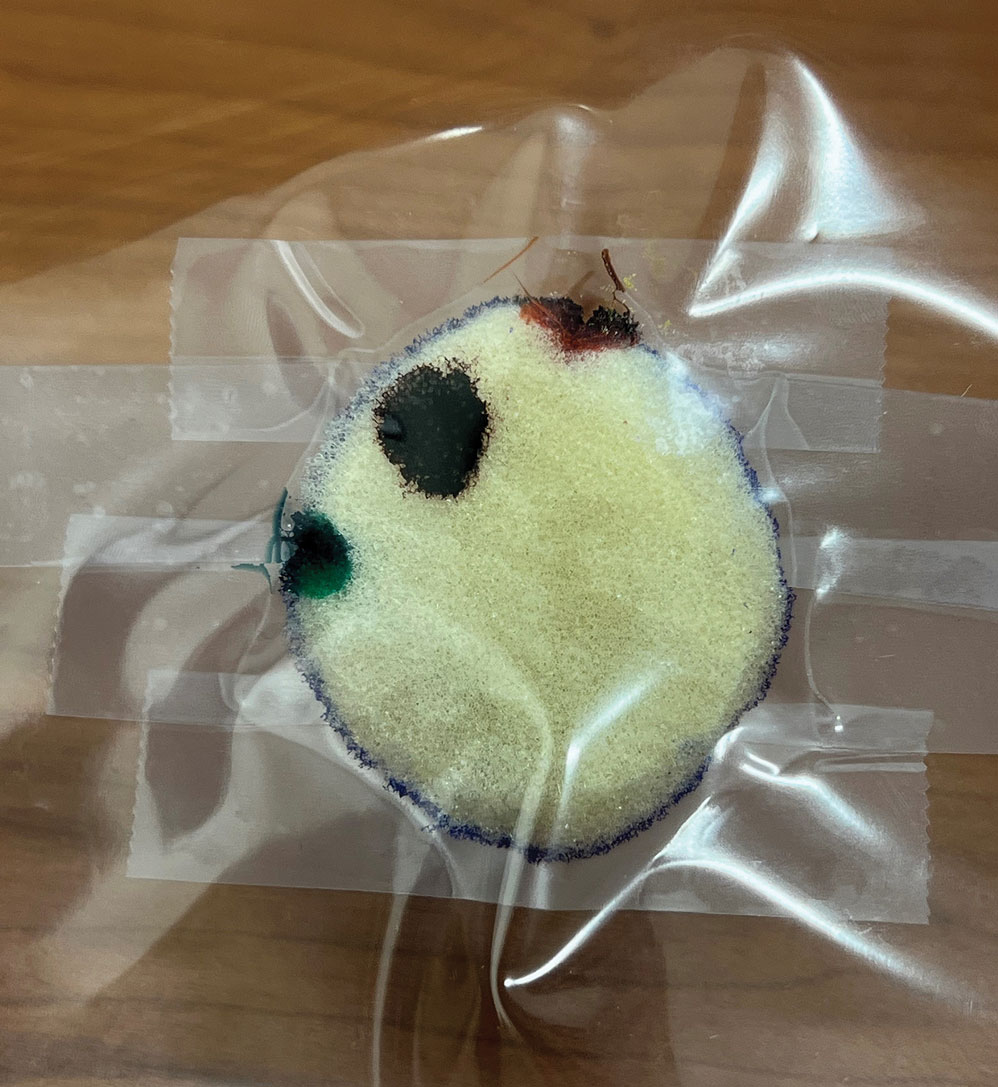
An inkwell holds different colors of washable paint to simulate tissue inking. After excision, the resident uses cotton-tipped applicators to apply different paint colors to the edges of the excised foam specimen at designated orientation points (eg, 3 o'clock and 12 o'clock). The resident then records the location of the excised sample by hand-drawing it on a printable Mohs map, labeling the corresponding paint colors to indicate orientation (Figure 3).
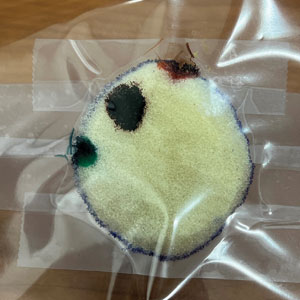
The resident then places the specimen between 2 plastic page protectors mimicking a glass slide and cover slip. Clear tape can be used to help flatten the specimen (Figure 4). The tissue is compressed between the page protector so that the simulated epidermis, dermis, and subcutaneous fat are all in the same plane. At this stage, the instructor may discuss the use of relaxing incisions, especially for deeper tissue specimens or when excision at a 45° bevel is not achieved.5 The view from the underside of the page protector reveals 100% of the specimen’s margin and mimics the first cut off the tissue block. The resident can visualize the complete circumferential, peripheral, and deep margins and can easily identify any positive margins. At this point, the exercise can conclude, or the resident can explore further stages for positive margins, bisected specimens, or other tissue preparation variations.
Practice Implications
By individually designing and removing a representative tumor with margins, creating hash marks, and preparing a tissue specimen for histologic analysis, our interactive teaching method provides dermatology residents with a relatively simple, effective, and active learning experience for MMS outside the surgical setting. Using a piece of craft foam allows the representative tissue to be manipulated and flattened, similar to cutaneous tissue. This method was implemented and refined across 3 separate teaching sessions held by teaching faculty (E.I.P and E.B.W.) at the San Antonio Uniformed Services Health Education Consortium Dermatology Residency Program (San Antonio, Texas). This method has consistently generated strong resident engagement and prompted insightful questions and discussions. Program directors at other residency programs can readily incorporate this method in their surgical curriculum by allocating a brief didactic period to the exercise and facilitating the discussion with a dermatologic surgeon. Its simplicity, low cost, and effectiveness make the foam block model an easily adoptable teaching tool for dermatology residency programs seeking to provide a comprehensive, hands-on understanding of MMS.
- McNeil E, Reich H, Hurliman E. Educational video improves dermatology residents’ understanding of Mohs micrographic surgery: a surveybased matched cohort study. J Am Acad Dermatol. 2020;83:926-927. doi:10.1016/j.jaad.2020.01.013
- Lee E, Wolverton JE, Somani AK. A simple, effective analogy to elucidate the Mohs micrographic surgery procedure—the peanut butter cup. JAMA Dermatol. 2017;153:743-744. doi:10.1001 /jamadermatol.2017.0614
- Vassantachart JM, Guccione J, Seeburger J. Clinical pearl: Mohs cantaloupe analogy for the dermatology resident. Cutis. 2018; 102:65-66.
- Stratman EJ, Vogel CA, Reck SJ, et al. Analysis of dermatology resident self-reported successful learning styles and implications for core competency curriculum development. Med Teach. 2008;30:420-425. doi:10.1080/01421590801946988
- Benedetto PX, Poblete-Lopez C. Mohs micrographic surgery technique. Dermatol Clinics. 2011;29:141-151. doi:10.1016/j.det.2011.02.002
Practice Gap
Tissue processing and complete margin assessment in Mohs micrographic surgery (MMS) are challenging concepts for residents, yet they are essential components of the dermatology residency curriculum. We propose a hands-on active teaching method using craft foam blocks to help residents master these techniques. Prior educational tools have included instructional videos1 as well as the peanut butter–cup and cantaloupe analogies.2,3 Specifically, our method utilizes inexpensive, readily available supplies that allow for repeated practice in a low-stakes environment without limitation of resources. This method provides an immersive, hands-on experience that allows residents to perform multiple practice excisions and simulate positive peripheral or deep margins, unlike tools that offer only fixed-depth or purely visual representations. Additionally, our learning model uniquely enables residents to flatten the simulated tissue, providing a clearer understanding of how a 3-dimensional specimen is transformed on a slide during histologic preparation. This step is particularly important, as tissue architecture can shift during processing, making it one of the most difficult concepts to grasp without hands-on experience. Having a multitude of teaching methods is crucial to accommodate various learning styles, and active learning has been shown to enhance retention for dermatology residents.4
The Technique
Residents use simple art supplies (including craft foam blocks and ink) and inexpensive, readily available surgical tools to simulate MMS (Table)(Figure 1). If desired, the resident can follow along with the comprehensive, stepwise textbook description of MMS, outlined by Benedetto et al5 to contextualize this hands-on exercise within a standardized didactic framework.
The foam block, which represents patient tissue, serves as the specimen. The resident begins by freehand drawing a simulated cutaneous tumor directly onto the foam using a surgical marking pen. At this point, the instructor discusses the advantages and limitations of tumor debulking with a sharp blade or curette. Residents then mark appropriate margins (1-3 mm) of normal-appearing “epidermis” on the foam block and add hash marks for orientation. This is another opportunity for the instructor to discuss common methods for marking tissue in vivo and to review situations when larger or smaller margins might be appropriate.
Next, the resident removes the first layer of simulated tissue using a disposable #15 blade scalpel at a 45° angle circumferentially and deep around the representative tumor. The resident also may use scissors and tissue forceps to remove the representative tumor. Next, the excised foam layer (the simulated “specimen”) is transferred to gauze. To demonstrate a positive margin, the resident or instructor marks the deep or peripheral foam block with a surgical marking pen, indicating residual tumor (Figure 2). This allows for multiple sequential layers of foam to be removed, demonstrating successive stages of MMS.
An inkwell holds different colors of washable paint to simulate tissue inking. After excision, the resident uses cotton-tipped applicators to apply different paint colors to the edges of the excised foam specimen at designated orientation points (eg, 3 o'clock and 12 o'clock). The resident then records the location of the excised sample by hand-drawing it on a printable Mohs map, labeling the corresponding paint colors to indicate orientation (Figure 3).
The resident then places the specimen between 2 plastic page protectors mimicking a glass slide and cover slip. Clear tape can be used to help flatten the specimen (Figure 4). The tissue is compressed between the page protector so that the simulated epidermis, dermis, and subcutaneous fat are all in the same plane. At this stage, the instructor may discuss the use of relaxing incisions, especially for deeper tissue specimens or when excision at a 45° bevel is not achieved.5 The view from the underside of the page protector reveals 100% of the specimen’s margin and mimics the first cut off the tissue block. The resident can visualize the complete circumferential, peripheral, and deep margins and can easily identify any positive margins. At this point, the exercise can conclude, or the resident can explore further stages for positive margins, bisected specimens, or other tissue preparation variations.
Practice Implications
By individually designing and removing a representative tumor with margins, creating hash marks, and preparing a tissue specimen for histologic analysis, our interactive teaching method provides dermatology residents with a relatively simple, effective, and active learning experience for MMS outside the surgical setting. Using a piece of craft foam allows the representative tissue to be manipulated and flattened, similar to cutaneous tissue. This method was implemented and refined across 3 separate teaching sessions held by teaching faculty (E.I.P and E.B.W.) at the San Antonio Uniformed Services Health Education Consortium Dermatology Residency Program (San Antonio, Texas). This method has consistently generated strong resident engagement and prompted insightful questions and discussions. Program directors at other residency programs can readily incorporate this method in their surgical curriculum by allocating a brief didactic period to the exercise and facilitating the discussion with a dermatologic surgeon. Its simplicity, low cost, and effectiveness make the foam block model an easily adoptable teaching tool for dermatology residency programs seeking to provide a comprehensive, hands-on understanding of MMS.
- McNeil E, Reich H, Hurliman E. Educational video improves dermatology residents’ understanding of Mohs micrographic surgery: a surveybased matched cohort study. J Am Acad Dermatol. 2020;83:926-927. doi:10.1016/j.jaad.2020.01.013
- Lee E, Wolverton JE, Somani AK. A simple, effective analogy to elucidate the Mohs micrographic surgery procedure—the peanut butter cup. JAMA Dermatol. 2017;153:743-744. doi:10.1001 /jamadermatol.2017.0614
- Vassantachart JM, Guccione J, Seeburger J. Clinical pearl: Mohs cantaloupe analogy for the dermatology resident. Cutis. 2018; 102:65-66.
- Stratman EJ, Vogel CA, Reck SJ, et al. Analysis of dermatology resident self-reported successful learning styles and implications for core competency curriculum development. Med Teach. 2008;30:420-425. doi:10.1080/01421590801946988
- Benedetto PX, Poblete-Lopez C. Mohs micrographic surgery technique. Dermatol Clinics. 2011;29:141-151. doi:10.1016/j.det.2011.02.002
Interactive Approach to Teaching Mohs Micrographic Surgery to Dermatology Residents
Interactive Approach to Teaching Mohs Micrographic Surgery to Dermatology Residents